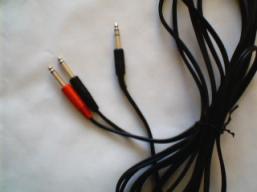
Picture 1. A standard stereo 1/4" jack cable split in two 1/4" mono jacks, also known as INSERT CABLE.
For
Eventide DSP4000/7000/4000B+/ORVILLE™/H8000™/ECLIPSE™
Ultra-Harmonizers®.
A
very useful and powerful feature of our UltraHarmonizers® is real
time, external control of
In
the DSP4000, DSP4000B, DSP4500 & GTR4000 units you can connect one pedal for
continuous control to the FOOT PEDAL INPUT and two switches for momentary control
(latched or unlatched) to the FOOT SWITCH INPUT. Both inputs are stereo
tip/ring/sleeve 1/4" jacks connectors.
Your
units are equipped with two inputs, called PEDAL 1 and PEDAL 2. Each one can
accept either a pedal for continuous control or up to three switches for momentary
control (latched or unlatched). Please refer to your manuals for soldering
schematics of the three-switches connection. Both inputs are stereo tip/ring/sleeve
1/4" jacks.
You
can also choose to have only two switches. A total of two pedals or six switches or
a combination of them is possible.
In
all units the sleeve is ground reference, the ring is +5 volts (source) and the
tip is an analog signal from 0 to 5 volts. Connect foot switches, foot pedals or
control voltage sources to these inputs to modulate parameters or to trigger
events (including remote program loads).
Some
foot pedals already come equipped with a stereo 1/4" jack connector, ready
to be plugged in.
Many
others don't. Most foot switches do not have a cable at all.
Let's
take a look at cables and plugs to get our controls up & running in a
moment.
When
your pedals & switches do not have cables included, the cable you will need
is the one in picture 1.
Picture
1. A standard stereo 1/4" jack
cable split in two 1/4" mono jacks, also known as INSERT CABLE.
This
cable is pretty common on the market today;
many companies have such products in their catalogs.
A
clever way to build a cable like this, without any soldering, is to get a common
RCA stereo cable, like those we all use for home stereo set ups, with black and
red RCA connectors. We normally use these cables to connect CD players, radio
tuners & cassettes decks to compact amplifiers.
Get
also 2 mono females RCA to 1/4" mono male jacks adaptors and a 2 mono
females RCA to 1/4" stereo male jack adaptor like those in picture 2, for
each cable you need to convert.
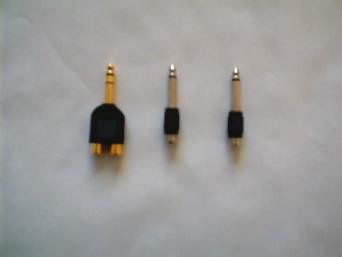
Picture
2. Left: a 2 mono female RCA to 1/4" stereo male jack adaptor. Center
& right: 2 mono females RCA to 1/4" mono male jacks adaptors.
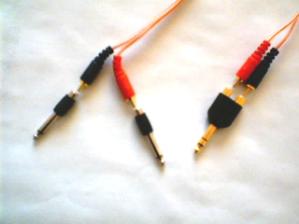
Connect
the RCA cable to the three adaptors like in picture 3.
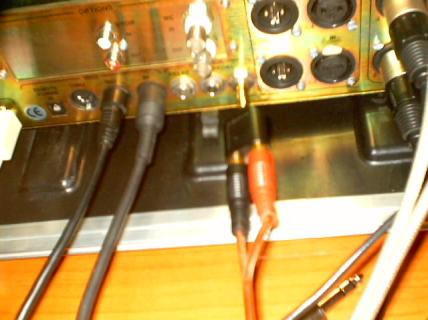
Once your cables are ready,
connect the bigger stereo adaptor to the UltraHarmonizer® rear panel PEDAL or
FOOTSWITCH input; then connect the 2 mono adaptors to the input and output of a
volume pedal or connect each one to
a momentary switch output. Try swapping input
with output if it doesn't work properly. Check these connections in pictures 4, 5 and 6.
 |
 |
|
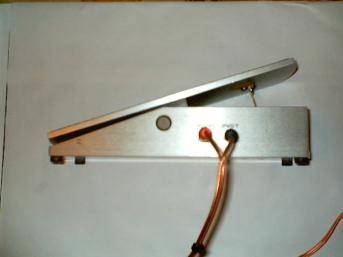
Picture 4. A Foot Pedal or 2 or 3 Foot Switches connected to ORVILLE rear
panel PEDAL 2 input. |
Picture 5. A Foot Pedal connected at the other
end of our "smart" cable. |
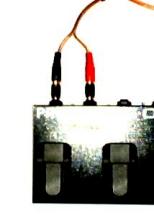
Picture 6. Or a double Foot Switch connected at
the other end of our smart cable.
Hopefully this smart cables will save you quite
a headache. We all have RCA cables around, don't we? And some plugs converters
too! Here is a chance to use them in a clever way.
In my long time experience I have always found
terrible differences between pedals: more often than you would think,
potentiometers can be very different; even two samples of the same pedal will
have different electrical values. This often translates into a pedal not being
able to express the full range of power, necessary to control a parameter in its
full range, from 0% to 100%.
To avoid the potentiometer's inconsistency you
need to test as many pedals as you can. There is no other way around it. You
have to connect each one, patch a parameter to the pedal and visually control
that its sweep covers the full range, from 0% to 100%.
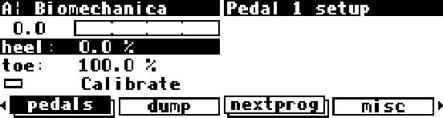
We have added a cool "CALIBRATE PEDAL"
utility in the SETUP area of these units; it will allow you to overcome all
pedals electric quirks.
 |
|
| Picture 7. Orville/DSP7000/7500/4000B+
Pedal Calibration screen. |
Picture 8. Eclipse Pedal Calibration screen. |
![]()
This technote was written by Italo De Angelis.